Friday, January 29, 2016

Even more QcK surface - user experience with SteelSeries QcK XXL

I have been using mousemat - as it's hard to call something sized 900x400x4mm a mousepad ;) - from the title of this post for a month now. Today, I'd like to share my insights from the past month with you.

The name of SteelSeries mousepads - QcK - should indicate that it's a speed type surface, which means that your mouse will glide with the least possible friction. Despite its name, QcK surface is rather a "slow", control type, which will allow you to have better control over your mouse and better precision. It's not a drawback, but depending on your gaming style, favorite mouse and types of games you play - it will matter. Initial glide on QcK has some friction to it, but after that it's rather smooth, which allows higher precision movements.

The mousemat is, sadly, not braided, but the underside looks very solid and it adheres to my varnished desk well enought, that if I want to move it, I have to pick the whole thing up from the table top.


From my observations, the mat soaks liquids very quickly, which might be an issue for anyone whose hands get sweaty during gaming. QcK will accumulate sweat, collect dirt and germs, and the surface will loose some of its parameters in those spots. As it has some rough texture to it, QcK attracts dust easily. I didn't have a chance to wash it in washing machine (or use other methods for that matter) yet, but other users said they were able to do it without any issues, if you use a protective bag so the edges won't shred. 

This mousepad is 4mm thick and it's quite hard. It's hard enough that your mouse won't have any issues even if you tend to push it firmly, but at the same time is soft enough to rest your wrists on it while gaming or typing :) And when you take a break between matches of your favourite games - it just begs you to lay your head on it and doze off :D


The size of this thing will allow for a lot of comfort when it comes to space for your mouse. You can easily put a keyboard on it and still have more than enough space to game with low DPI settings. 900mm in case of smaller desks is usually the whole width of a table top, so be sure to measure if you can fit it on yours :)

Personally I'm delighted to use QcK XXL. It fits my desk space perfectly, allows me to comfortably change positions during gaming sessions without moving it and my banged up keyboard without rubber feet won't move an inch anymore ;)


If I was to assign SteelSeries a score for this product, it'd be solid 4+/5. The biggest drawbacks are: lack of braiding on edges and the way it absorbs water. I only hope I will be able to clean it easily and that lack of braiding won't make it less durable. I strongly recommend QcK XXL if you're looking for a large mousemat for your battlestation :)

Mousemat has been bought at X-kom store and gifted to me by the Wife ;)

Friday, January 22, 2016

SilentiumPC Gladius M35 Pure Black - review


Today I'd like to share my insights about building a rig with a very interesting SilentiumPC low/mid-end case. As the title of this review says - I want to share a few words about Gladius M35.


Exteriors


M35 dimensions are as follows: 486×502×200mm, in mATX/ATX standard. The front panel holds only two 5,25" bays and dust filter mesh. Behind that mesh a space for two 120 or 140mm fans can be found. The case comes with one Sigma Pro 120mm fan (1200rpm). Side panels are smooth and feels quite rigid for a case in this price target. SilentiumPC claims that they used SECC steel, and it really shows. Panels are about 0,7mm thick.


Top side of the case holds the front interface, from the left side: a power button with white LED, small reset button, HDD activity LED, headphones and microphone jacks, two USB2.0 and two USB3.0 and two three-levels fan controllers. A small but appreciated detail are rubber cover caps for all those connectors (not shown in the picture), which will prevent the dust from gathering in them. 

Front interface

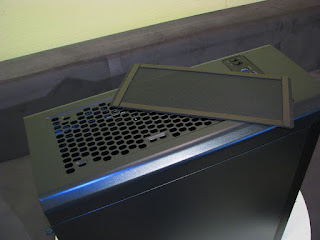
Behind the front interface we can find a top dust filter made of flexible mesh attached with magnetic strips. Under the filter is mounting space that could hold 240/280 rads and/or 120/140 fans. 


Top side dust filter

The back of the case is rather straightforward. There is a lot of perforation to improve airflow. Back fan is also a Sigma Pro 120mm. In theory you could also mount a 120mm rad in there too. Unfortunately there isn't a 140mm fan option in here. Luckily , SilentiumPC decided not to include holes and grommits for external radiators. Side panels are screwed with toolless screws that aren't so much toolless in the end. Included screws are made of metal, but are put in plastic handles, and you will have to use a screwdriver to screw them tighter.


Back of the case

Let's look under the case. You can find a standard low-end dust filter here, same as other cheaper SilentiumPC cases or Zalman ones use. Plastic feet have pieces of rubber glued on them, which will stop vibration and protect the surface from being scrached.


Under the case

Interiors


Interior of Gladius M35

The interior of Gladius M35 can be quite a shock if you look at the price of this thing. The first thing that catches the eye is a shroud covering the PSU and two 3,5" drives. Additionaly you can find two 5,25" bays, but unfortunately you can't mount an optical drive in the top one, as front panel cables will block it, so reserve it for some other hardware. In M35 you can also mount three 2,5" drives - two near the front side panel and one in the back of motherboard tray. 

Front side interiors
Back side slot covers are screwed in with the same screws as side panels. The case is equipped with two fan controllers. Each of those will need a molex power plug, and can accommodate up to three 3pin fans each. There's a lot of space behind the motherboard tray, enough to route a 24pin ATX power cable, but you can forget about putting one cable over another. Luckily there are a lot of points where you can ziptie your cables to the tray. The front side can accommodate 120/140, 240/280 and 360mm rads, but to mount a 360 one, you will have to remove 5,25" cage. You won't be able to put a thick rad in there too, same as on the top side. 

Behind the motherboard tray

The PSU shroud is smooth and well built. Unfortunately it's riveted to the case floor, so you won't be able to remove it easily. 


Space under the PSU shroud

Space under the shroud is a bit limited. I was able to put a fully modular OCZ ZT Series PSU, but just barely, and it's rather a standard sized one (150 x 86 x 175mm). I'd suggest you to plug all your cables to the PSU and mount it afterwards. Also, mounting is not a breeze with that shroud in the way. PSU is isolated from the case floor with rubberized feet, but nothing stands between the PSU and back side of the case. 

Summary


Gladius M35 is a borderline low/mid-end case. For it's price it's hard to find other case that will have as many perks as this one: steel panels, PSU shroud, two fan controllers, enough space to mount 5 drives and possibly enough space to mount two 240mm rads or reattachable back side slot covers. There are a few details that are clearly there to save SilentiumPC some money in production costs - those toolless screws and riveted PSU shroud to name only two. There still are ways to improve, but when you consider the price of this case, it makes very popular and just slightly cheaper Zalman Z3 Plus case really pale. If you're in the market for a cheap case, then SilentiumPC Gladius M35 is definately something to be considered :)


Honestly I can rate Gladius M35 with a strong 4+ in 5 points scale.

The case used for this review was made available by a reader I built a rig for. 


A rig built for one of my readers :) 

Friday, January 15, 2016

Cable management - excessive pedantry or a good practice?

Cable management is one of those particular discussion topics among PC users. Especially when it comes to the insides of a case. And cable management inside of a case is the topic of this short article.

When a discussion about cable management starts somewhere in Interwebz, two sides form up almost instantly. One is showing off their cable managed systems and the other says how much they don't care about it, that it's a waste of time and generally that it's just bollocks not worth their attention. I'm not gonna lie here - I'm mostly in the first group ;) 

So what speaks for spending a few moments to arrange your cables in the case? There are a few points actually and effects can be surprising sometimes. 

Airflow

In most cases, the way in which parts are arranged in a PC case, places where power connectors are, makes it that when you connect your power cables via the shortest route, you will end up with a massive cable bundle just in the center of your case. Exactly in the spot where the stream of air is coming from the front case fans. It's a great way to block that airflow, which is needed to deliver room-temperature air to all your components and push the hot air out of the case. If you try hard enough, you can block the airflow and raise those under load temperature of parts by a few Celsius degrees. Higher the temperature is the more trouble it means. On top of that, this web of cables is just perfect for dust to settle on, which will block your airflow even more. 

My first attempts at cable management, and effects are already showing :)

Ergonomics

Have you ever wanted to pull your hard drive or optical drive out of the case but cables blocked it? Or you couldn't plug a new drive, because entangled and ziptied cable couldn't reach it? And that's just the tip of an iceberg. Cables winding everywhere around your case makes doing any work inside of it a real drag. If your cables are neat and out of the way, you can easily find needed plugs to install a new hardware and it makes it easier to dust everything off. 

Aesthetics

Bundles of wires don't look pleasing at all. It usually matters only if you've got a window in your case side panel, but even if your beast's belly is hidden most of the time, it's good to make it look good for just that few moments when someone will look inside of it ;) 

So where to start?

So how do you actually go about cable management inside of your case? For beginners, the best option is to think about it as soon as you start picking your parts. Pick a case that allows you to easily  arrange cables and a power supply that has long cables. Bonus points if it's modular. Even if you just hide your cables behind the motherboard tray, it will be a gamechanger, and that's just the beginning of the long way to cablemanaged zen garden ;]

It doesn't mean that you can't cable manage a rig that isn't perfectly adapted for it. You will gain the skill and experience eventually, and guys (& gals ;)) that are really good at it can even cable manage those old IDE straps ;) I strongly encourage you to make some research on the Internetz - you can find awesome work, which might inspire you to how to go about cable management in your rig. 

It was harder back in the day ;) [Source: techwarelabs.com]