Showing posts with label case. Show all posts

Friday, March 18, 2016

Small is beautiful, isn't it? Antec ISK 600M review

Today I'll try to share something with you about another case I had in my hands lately. As the title says - it was an Antec ISK 600M. It's a micro-ATX Cube case, measuring 290mm (H) x 272,6mm (W) x 340mm (D), comes in stylish black colour.


Exteriors

Antec decided to play safe when it comes to the front panel. It's made of plastic imitating brushed aluminum, and a mat bezel with front interface on it. There's also a place for slim optical drive.


ISK 600M front panel

The front interface is quite conventional. On the left side of it you will find one USB 3.0 port, audio and mic jacks and one USB 2.0 port. The blue USB 3.0 can be also connected as USB 2.0, as the cable has two type of connectors and attached instrucions saying to use only one of them. Sadly, USB 2.0 is on a separate cable, which means that with some motherboards (especially smaller ones) you won't be able to connect both of those USB front ports.

Left side of the front interface

Right side of the front interface is composed of Reset and Power buttons, hidden underneath pieces of flexible plastic, which has to be pushed in to use those switches. This construction prevents the user from pushing them accidentally, but I’m not sure about durability of those plastic plates. 

Right side of the front interface

A blue LED strip is hidden underneath the front panel bottom side, making surface under the case light up with aural effect. You will have to connect it to an external power though, using a molex plug. 

On the left side of the case you will find air vents for the front 140mm fan. Additionally you can observe the height the case stands from the surface and it’s standard feet. There’s also a cutout that allows a GPU better airflow.

Left side of the case

The right side of the case is very similar, but the airflow cutout is longer. Both panels and the top of the case are actually a one sheet of steel.

Right side of the case

On the back you can find pretty standard cutouts, although they tell you a bit about how the interiors of Antec ISK 600M are arranged. First of all, motherboard will be mounted horizontally, GPU and other expansion cards vertically. There’s room for a full ATX power supply on the floor, protected with dust filter made of fine mesh strapped on a plastic frame.

Back side of the case

There’s also some rubber grommets for custom liquid cooling solutions, additional air vents and one 120mm exhaust fan. As you can see, there are four back slot covers that can be reattached, that are hold in place with additional metal frame. It’s quite good system, allowing you to easily remove or put those covers back in place.

Back side of the case

Bottom side won’t surprise you too – there’s a dust filter for the PSU, some mounting cutouts and LED strip in the front. As you can see, front feet are removable, back ones are glued on. 

Bottom side of the case


Interiors

When you take the sheet of steel covering both sides and the top of this case, you will see two chambers of the Antec ISK 600M. Bottom one, a smaller one, will hold your PSU and up to three 3,5” drives in a bay. There’s a place for additional 80mm fan that will take the hot air from those drives and exhaust it on the back. There’s a lot of space for cables here, and you will be able to connect those drives easily. The PSU sits on a dampening foam strips.

Bottom chamber

In the main chamber you will mount rest of your components. The case is compatible with Micro-ATX and Mini-ITX standard motherboards. You will be able to put a GPU as long as 312mm and a CPU cooler up to 175mm height. The top side of the case holds a bracket for up to four 2,5” drives and a slim optical drive.

Interiors

Left side of the interior has mounting holes for two additional 120mm fans, but mounting both of them means you won’t be able to use that top drives bracket. The front panel is easily detachable with plastic latches on both sides. The front fan is protected with loosely grilled metal plate of the front side, but there are some cutouts and space to run some of your cables to the top drive bracket.

Removed front panel

Both case fans have manual RPM controllers. I was able to put the exhaust fan controller outside of the case using those rubber grommets, but there is no way to get access to the front one from the outside of the case, which is a bummer.
Więcej wnętrza

Summary

Antec ISK 600M is a very interesting, mid-range case offering nice form-factor and a lot of space inside to mount some more powerful hardware. As far as main cons of this case come, it might be impossible to use both of those front USB ports at the same times with many smaller motherboards. The mounting system for additional side fans could be done smarter to allow use of the top drive bracket. Also, the front fan could be placed better. There are a lot of space under that front cover, but that fan is exactly on the same width as those air vents, and that won’t give you great airflow in there. Those fan RPM controllers are a bit weird too, it’d be better to include a simple fan controller on the front side of the case and connect both those fan to that. 


As for the pros, the build quality is really great for this price point – it’s very stable, doesn’t wobble and still quite light. Expanding options are great too. You can mount six fans overall in this case! I think that you could put a CPU AiO cooler in there, not only with 120mm rad, but a 240. slim one too. There’s also enough space in both compartments to run a custom loop in there, especially if you go with the smallest motherboards. It could use some more cable management tie points, because I found only two of those, and they weren’t very useful with the small board I used for this build. 


Personally, I would give Antec ISK 600M a solid 4+/5 score, especially thanks to the price of this case. It’s definitely a very nice case for someone who wants to go for smaller form factor, but still would like to have a lot of space for larger components and a lot of space to work with. Good job, Antec! :)

A rig built in Antec ISK 600M from the top view :)

Right side of it


And left side

The case used for this review was provided by a reader that I built this rig for :)

Friday, February 26, 2016

Why you shouldn't go cheap on PC case?

Today we will talk about PC cases. I sometimes scroll through some groups and messageboards, where people ask for help with making a parts list for their new rig. And there's a lot of "good guys" ready to "help out" dropping their lists like crazy. And I look at those and wonder if I should burn my eyesockets inside out, or just disconnect from the Web forever. "But why?" you ask? Well, about cases that are in those setups. It looks like Zalman Z3 Plus is just a perfect case for every rig out there. Don't get me wrong, Z3 Plus is a decent chasis. In it's price point. In line with the budget for a rig. But it's not a good choice for a 5 000 USD setup! And that kind of "advice" are all over Polish web, everyday! 

Zalman Z3 Plus [zalman.com]
I think that those "advisors" have their low-end rigs in those Zalman cases and that's the only case they know. Apart those before-2005 grey bricks. And there is nothing wrong with their rigs. Case is matching the rest of parts, they got something of better quality than before, so they recommend it. They are happy with it, after all, so why not to recommend it? In the same way, if someone drove a falling-apart, old car for most of their life, and now got a Smart, they will recommend a Smart to everyone. They like driving their new car, it has it's perks - so it has to be the best car ever, right? And here's the core of this issue, because when he gets into a real car ;) it will open his eyes. I think it's the same with computer cases.

Anyone still has one of these? ;) [overclock.net]

Therefore in situation I described here, we have parts for a lot of cash put into a 30$ case. Most expensive part will be a GPU, for sure. And the most surprising about it, is the fact it's the fastest part to age. But things that will age longer and you should invest your money in is usually ommited. Quite literally, becasue when you look at those part lists, you will see that the case is on the end. Usually there's 25-35 bucks left in the budget, so they slap that Z3 Plus or plastic Gladius M20 and post it, the faster the better, because there is bunch of "helpers" like that, who might post a part list with a GPU from a manufacturer I don't like! 

Corsair Graphite 760T Arctic White [corsair.com]

So why you should care and invest into better cases? I'll start with a point I have mentioned already - you will have to swap your GPU once per 2-3 years, to keep up with new games. CPU? Once per 5 years, maybe longer. Similar with the RAM. Storage drives? PSUs? You can use them as long as they don't show any sign of incoming failure. Especially PSUs - some come with 7 years warranty, for free. And today's post hero - a case. That's a piece of hardware that won't get used up, if it's decent quality. Worst case scenario - case fans will fail and you will have to swap them. But, truth to be told, first thing to do when you get a Z3 Plus, you will have to dish out 15-30 bucks to get some decent fans. Unless you want to piss off your family a bit with the noise. 

Corsair Carbide 900D [corsair.com]

I won't get deep into aesthetics - it's a matter of taste. Everyone will like something else. One thing is universal - the better quality of materials used, the better case will look like. And that's a fact. 

The easiest flaw of cheap cases is building comfort. I built rigs in Gladius M20, Z3 Plus. I've built some in Fractal Design Define R4 and Define S. I had some better SilentiumPC or Corsair cases in my hands. There is a lot of detail, which will make building a rig in a cheaper case a horror. Things like location of cable grommits, space behind motherboard tray, way of assembling some parts or cable management elements.


NZXT H440 [nzxt.com]

Other topic is build quality and durability. It's simple - some cases will bend when you put parts in them. A 100kg guy fell on my friend's Define R4. They glued the front panel back in place (hooks broke off) and... he got back to using his PC. Steel structure and thick steel sidepanels protected his rig just fine! 

Fractal Design Define R5 Black Window [fractal-design.com]

On top of all those points there are details that have impact on the overall work comfort with your PC - case stability, sound dampening, anti-vibration. You won't find those things in a cheaper case, and it's hard to appreciate it, if you haven't experienced it before. 

To sum this up - buying a better case is basically one of the best investments you can make when you buy a new rig. A good case will serve you for years to come. For example, it's better to rather take that 8GB of RAM instead of 16GB, but get a better case, instead of having to replace it in two years. And you can always get more RAM with the next paycheck! ;) Sure, that advice is not applicable if we're talking about low-end systems. There are limits of performance-per-dollar which you should not cross, especially for lower end systems. In those events you will have to save some money on a case for example. Just be considerate and keep a healthy performance-per-dollar balance :)

Friday, February 12, 2016

Fractal Design Define S - Define series facelift?


This week I had inexpressible pleasure of building a rig in Fractal Design Define S case. By the pleasure I mean that I'm probably a Fractal Design fanboy. My rig sits in a Define R4 ;)


Exteriors


Entire case measures 233 x 465 x 533mm and you can fit up to ATX motherboard in there.

On the front you will find a well known Define series front panel with a blue LED cutout. Define S don't have any kind of door here though, like Define R has. There aren't any 5,25" drive bays on the front, but you can mount up to three 120/140mm intake fans or a radiator up to 360mm. The whole front is covered with a fine dust filter. In stock you will find one Fractal Design Dynamic GP14 140mm fan here. Side panels are very sturdy and thick, made of steel, with some sound dampening material. You won't find that on a panel with a window of course.


Dynamic GP14

Let's take a look on the front interface, located on the top side. It consists of two audio jacks, reset button, large power button with power/drive LED and two USB 3.0 black ports. You won't find two additional USB 2.0 ports or fan controller, which could be seen in Define R4/R5. Drive LED blinks with other tone of blue to indicate the system drive status. 

Front interface

Next, behind the front interface is ModuVent system, which is a set of three toolless panels with dampening material, easy to detach, that covers space for top fans and/or radiator. You will be able to fit up to three 120/140mm fans or one 180mm fan with a 165mm hole spacing. As for the radiators, you can slap a pretty big ones there - 420, 360, 280, 240, 140 or 120mm. For 420, 280 and 140mm rads the thickness clearance is 55mm for rad+fans. Unfortunately, when you take the ModuVent pieces off, there is a large unfiltered gap if you mount 120mm fans/rad. 

ModuVent system

Back of the case can only surprise you with a little in air ventilation depratment - less than in other Define chasis. It's rather standard looking otherwise - reattachable slot covers, space for a PSU isolated from the back of the case and it's floor with rubberized feet, another GP14 1400mm fan and steel, toolless screws for side panels, which are attached to it permanently, so you won't loose them that easily.

Back of the case

Let's look under the case. Here you will find well known Define series elements - ruberrized feet, long dust filter for both PSU and a floor mounted fan. There are some mounting points for custom loop elements too. You can mount a 120/140mm fan or 120mm rad here. There's also a handle to remove the front panel cover.

Underside

The side panel windows is colorless, very rigid and quite large to show all of your parts inside, including custom loop components. It reflects light very well too ;)

Side panel with window

Interiors


Inside Define S looks familiar at the first glance, but then you spot the lack of 5,25" bay brackects or 3,5" cages for that matter. But you will find a lot of space with mounting points for liquid cooling components, such as pump and reservoir. It's possible thanks to bigger MOBO backplate, that spans across the whole case now. 

Define S interiors

The MOBO backplate has a twist too, it's bent a little to make some additional space on the other side. It affected the size and place of some cable grommets. Frankly, the interior looks like it has been dismantled. Lets see the other side. 

Cable grommets

Here, Fractal engineers put some cool stuff. You can mount two SSDs behind the mobo tray, but check out that clever 3,5"/2,5" three mounting points on the left! Also - velcro straps for cable management are a good addition.

Magic happens behind the scene

Innovative 2,5"/3,5" mounting points

Summary


Define S, at the first glance, is very similar to it's more expensive brother - Define R5, or it's older brother - Define R4. But this chasis is a little bit different than those two, and you have to make sure to know them before you buy this case. For a regular PC user it's a stripped down and less expensive Define R5 counterpart. It lacks the fan controller, 5,25" drive bays, has less space for drives, underside dust filter is shorter and harder to access. But this chasis is a real treat for custom loop enthusiasts. There are a lot of additions that support liquid cooling in a standard ATX case for around 100 USD. You can easily mount two large rads, nice high reservoir with a pump and still have enough space for some HDD and SSD without making the chasis very big. 

Additionally you will find many well known Fractal solutions with their reliability and quality. The case is mostly made of steel, which makes it very sturdy and stable. Plastic elements don't creak or squeak and everything fits just perfectly.

As with Define series - building a rig in this chasis is just a pleasure and the effect is usually a great looking rig. This time I will put two ratings here: if you are planning on building a custom loop or throw some AiOs in there, then for this price this is clearly a 5/5. But if you plan to cool your parts with air, then lack of 5,25" bays or fan controller and only 2 front side USB ports might be an additional issue, But even taking that into account, this is still a solid 4+/5 case for me. 

That's how a regular rig looks like in Define S :)


The case used for this review was provided by a reader that I built this rig for :) 

Friday, January 22, 2016

SilentiumPC Gladius M35 Pure Black - review


Today I'd like to share my insights about building a rig with a very interesting SilentiumPC low/mid-end case. As the title of this review says - I want to share a few words about Gladius M35.


Exteriors


M35 dimensions are as follows: 486×502×200mm, in mATX/ATX standard. The front panel holds only two 5,25" bays and dust filter mesh. Behind that mesh a space for two 120 or 140mm fans can be found. The case comes with one Sigma Pro 120mm fan (1200rpm). Side panels are smooth and feels quite rigid for a case in this price target. SilentiumPC claims that they used SECC steel, and it really shows. Panels are about 0,7mm thick.


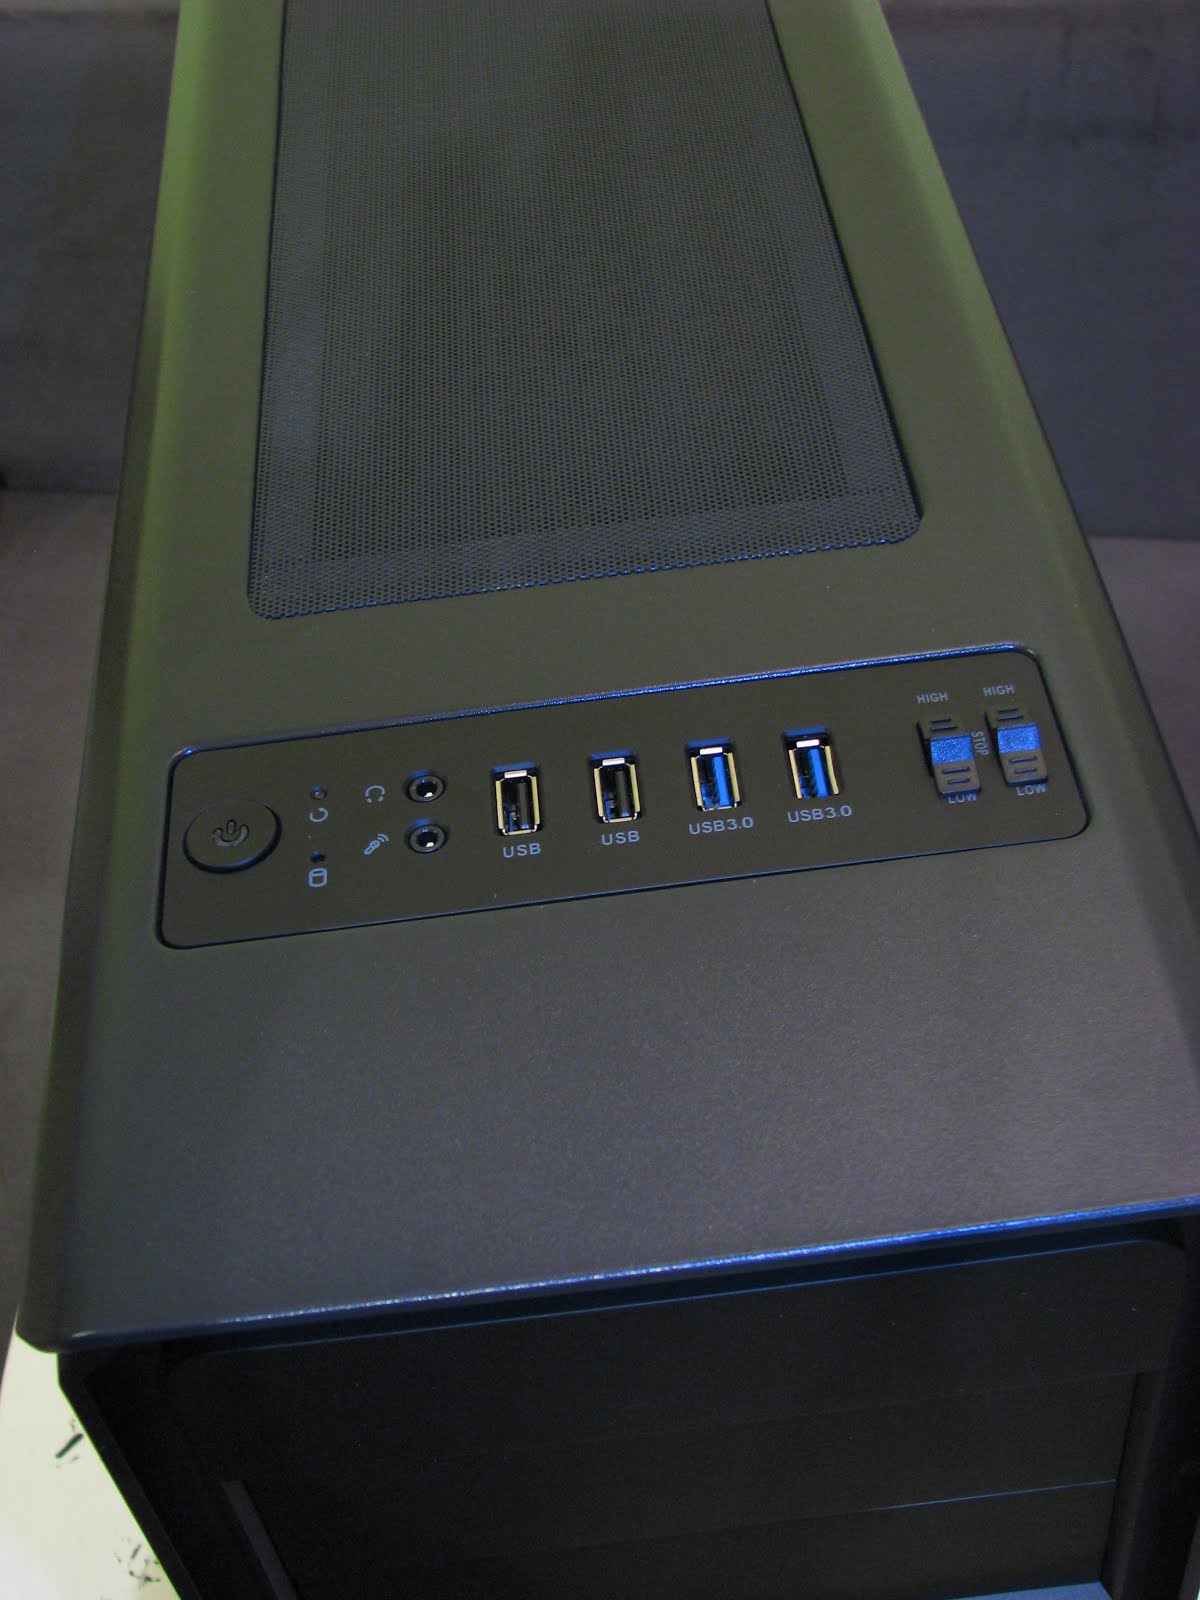
Top side of the case holds the front interface, from the left side: a power button with white LED, small reset button, HDD activity LED, headphones and microphone jacks, two USB2.0 and two USB3.0 and two three-levels fan controllers. A small but appreciated detail are rubber cover caps for all those connectors (not shown in the picture), which will prevent the dust from gathering in them. 

Front interface

Behind the front interface we can find a top dust filter made of flexible mesh attached with magnetic strips. Under the filter is mounting space that could hold 240/280 rads and/or 120/140 fans. 


Top side dust filter

The back of the case is rather straightforward. There is a lot of perforation to improve airflow. Back fan is also a Sigma Pro 120mm. In theory you could also mount a 120mm rad in there too. Unfortunately there isn't a 140mm fan option in here. Luckily , SilentiumPC decided not to include holes and grommits for external radiators. Side panels are screwed with toolless screws that aren't so much toolless in the end. Included screws are made of metal, but are put in plastic handles, and you will have to use a screwdriver to screw them tighter.


Back of the case

Let's look under the case. You can find a standard low-end dust filter here, same as other cheaper SilentiumPC cases or Zalman ones use. Plastic feet have pieces of rubber glued on them, which will stop vibration and protect the surface from being scrached.


Under the case

Interiors


Interior of Gladius M35

The interior of Gladius M35 can be quite a shock if you look at the price of this thing. The first thing that catches the eye is a shroud covering the PSU and two 3,5" drives. Additionaly you can find two 5,25" bays, but unfortunately you can't mount an optical drive in the top one, as front panel cables will block it, so reserve it for some other hardware. In M35 you can also mount three 2,5" drives - two near the front side panel and one in the back of motherboard tray. 

Front side interiors
Back side slot covers are screwed in with the same screws as side panels. The case is equipped with two fan controllers. Each of those will need a molex power plug, and can accommodate up to three 3pin fans each. There's a lot of space behind the motherboard tray, enough to route a 24pin ATX power cable, but you can forget about putting one cable over another. Luckily there are a lot of points where you can ziptie your cables to the tray. The front side can accommodate 120/140, 240/280 and 360mm rads, but to mount a 360 one, you will have to remove 5,25" cage. You won't be able to put a thick rad in there too, same as on the top side. 

Behind the motherboard tray

The PSU shroud is smooth and well built. Unfortunately it's riveted to the case floor, so you won't be able to remove it easily. 


Space under the PSU shroud

Space under the shroud is a bit limited. I was able to put a fully modular OCZ ZT Series PSU, but just barely, and it's rather a standard sized one (150 x 86 x 175mm). I'd suggest you to plug all your cables to the PSU and mount it afterwards. Also, mounting is not a breeze with that shroud in the way. PSU is isolated from the case floor with rubberized feet, but nothing stands between the PSU and back side of the case. 

Summary


Gladius M35 is a borderline low/mid-end case. For it's price it's hard to find other case that will have as many perks as this one: steel panels, PSU shroud, two fan controllers, enough space to mount 5 drives and possibly enough space to mount two 240mm rads or reattachable back side slot covers. There are a few details that are clearly there to save SilentiumPC some money in production costs - those toolless screws and riveted PSU shroud to name only two. There still are ways to improve, but when you consider the price of this case, it makes very popular and just slightly cheaper Zalman Z3 Plus case really pale. If you're in the market for a cheap case, then SilentiumPC Gladius M35 is definately something to be considered :)


Honestly I can rate Gladius M35 with a strong 4+ in 5 points scale.

The case used for this review was made available by a reader I built a rig for. 


A rig built for one of my readers :)